While IBM Cloud offers file storage services that can be utilized for NFS mount points for your ESXi hosts and virtual machines, starting with vSAN 7 VMware has also introduced the ability to create file shares alongside your block storage volumes on a vSAN datastore.
Why would you want to use Native File Services?
- Because it provides the ability to fully utilize your vSAN datastore.
- Because traffic is now isolated to the cluster – reducing dependency on the extended network for critical applications that rely on file services.
- Because you cannot achieve the needed performance using the IBM Cloud File Storage service.
Prerequisites
- The VMware Virtual SAN File Services Appliance – version 7.0U2 as of this post. You can download this code from vmware.com. Note that there are six files to this download and all six are required. If you vCenter through NAT or other access can access VMware directly to pull down packages this step can be skipped.
- Your VMware Solutions – Dedicated cluster must be licensed for vSAN Enterprise. If you instance is not licensed for vSAN Enterprise please contact your IBM Sales Representative about upgrading or deploy a new instance with the correct licensing.
- Prior to installation provision at least a /28 private portable subnet in the same secondary VLAN as your instance. The secondary VLAN can be found by navigating to your instance, clicking on Infrastructure, then clicking on one of your clusters. The reason for provisioning this subnet is that dedicated IP addresses are needed for each host for vSAN File Services, as each host will have an vSAN appliance. Note that the size of your subnet may need to be larger depending on the number of hosts in your cluster.
With those steps out of the way – let’s begin!
Deployment Procedure
- Log into vCenter
- Create a distributed port group on your cluster for vSAN File Services.
- Using the menu drop down select Networking.
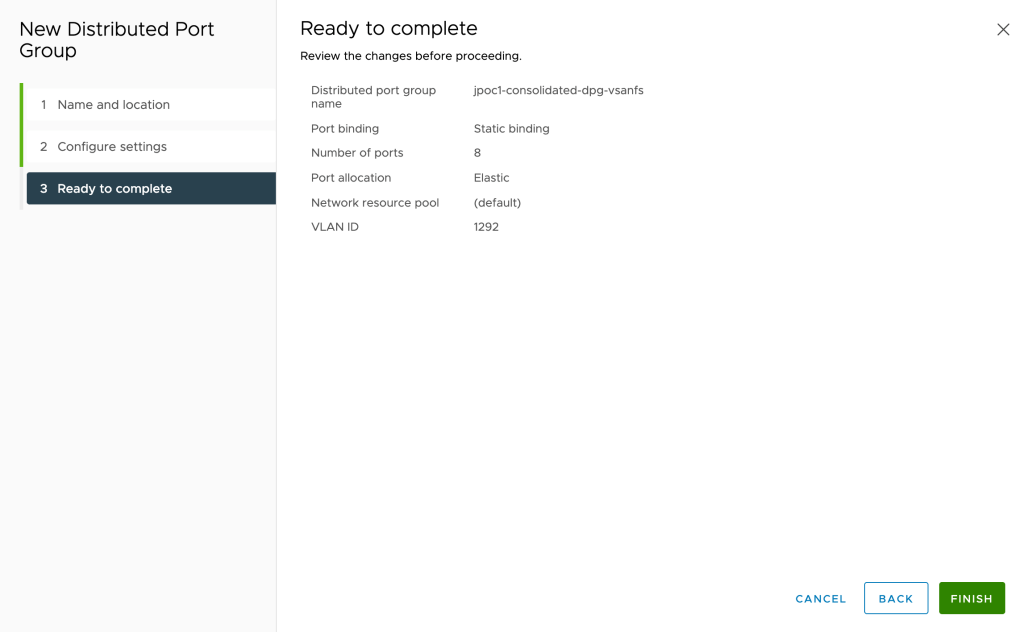
- Right-click on your xxx-consolidated-private distributed switch, where xxx is the name of your cluster, and choose Distributed Port Group –> New Distributed Port Group.
- Choose a name for your new distributed port group and click Next. Make sure that the name is one that you can use to identify the distributed port group later.
- On the configure settings page change the VLAN type to VLAN and type in the number of your VLAN. This is the same VLAN you provisioned your private portable subnet on earlier. Click Next.
- Click Finish to complete the wizard.
The screen shot below shows the completed wizard for our example cluster.
Next you will need to configure DNS for your provisioned primary subnet. vSAN File Services requires the IP addresses to be able to be resolved via DNS.
To do so:
- Using remote desktop – log into your AD/DNS servers that were provisioned as part of your VMware Solutions Dedicated instance. IP address and log in information for your instance can be found on the summary page of your instance.
- Once logged in to the AD/DNS server, open the DNS Manager application.
- You will need to create a reverse lookup zone for the private portable subnet you provisioned. However – one may have already been created for you if the private portable subnet you were provisioned shares the first three octets with an existing subnet that was provisioned as part of the VMware Solutions Dedicated. If the reverse lookup zone already exists skip to the next section where the DNS records are created, otherwise continue.
- Open the navigation tree until you see the Reverse Lookup Zones folder. Right-click on that folder and choose New Zone.
- Click Next to continue.
- Leave the radio settings at default (Primary Zone) and click Next.
- Leave the zone replication scheme at default and click Next.
- Leave the reverse lookup zone name at default and click Next.
- In the Network ID field type the first three octets of the private portable subnet you previously created. In our example our subnet is 10.93.187.32/28 so we use 10.93.187 as the Network ID. Click Next.
- Leave Dynamic Updates at the default and click Next.
- Click Finish to complete the wizard. The new reverse lookup zone will be created.
Now we need to provision our DNS entries.
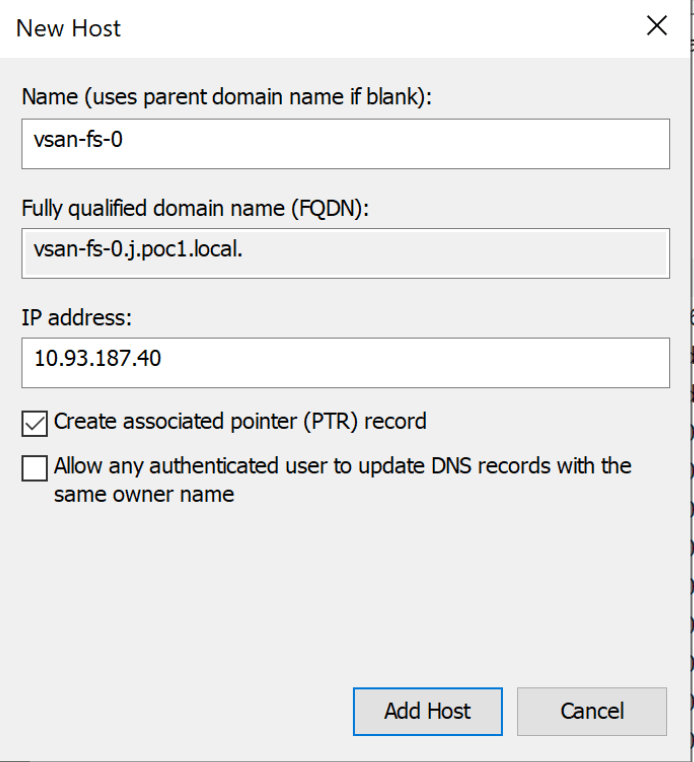
- Right-click on your primary lookup zone and choose New Host (A or AAAA).
- Provide a name and an IP address. Make sure the Create Associated Pointer Record (PTR) box is checked and click Add Host.
The example below shows adding the first host using vsan-fs-0 as the name and 10.93.187.40 as the IP address.
3. Repeat step 2 for all hosts in the cluster. Once complete click Done and close the DNS Manager.
The example below shows the four host names and IP addresses added for our test cluster.

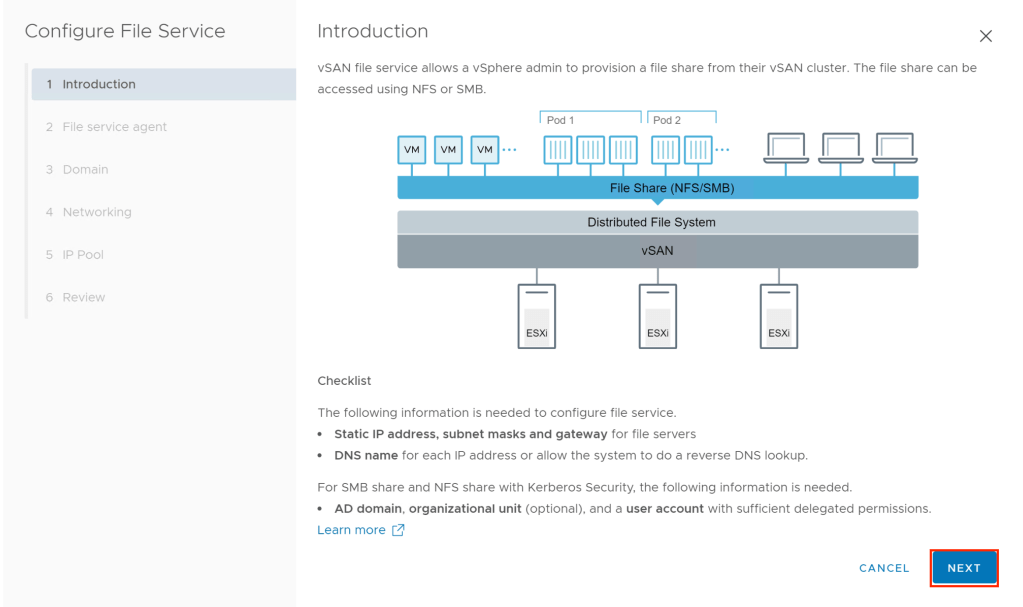
Switching back to the vCenter client, click on Menu –> Hosts and Clusters. Click on the name of your cluster then using the upper menu click on Configure. In the left hand-navigate scroll down under vSAN and click on Services. You will see the file service is currently disabled. Click on Enable to start the vSAN File Services wizard.

Click on Next on the Introduction.
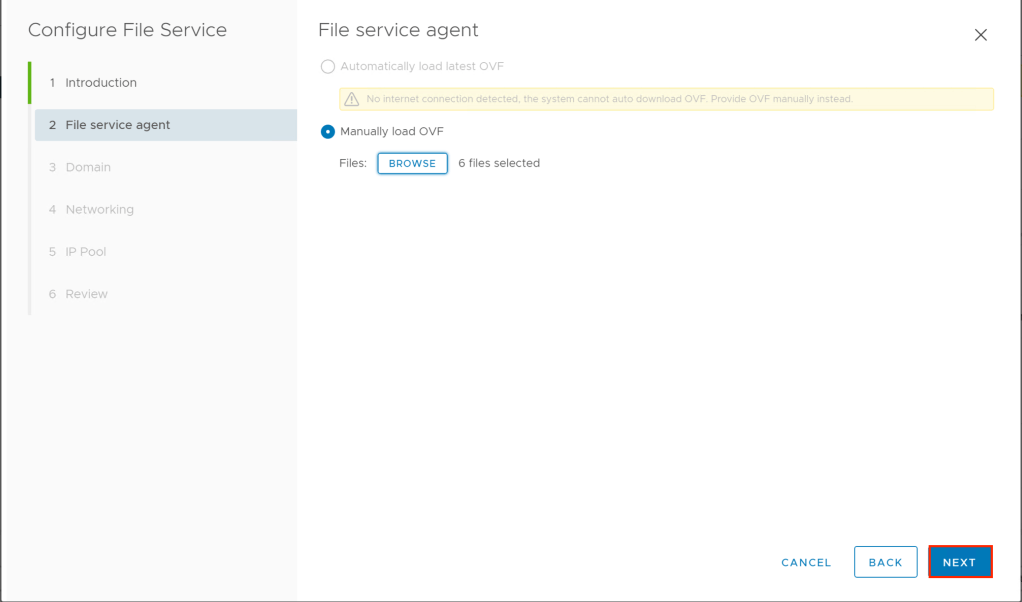
If your vCenter is unable to download the required packages automatically an error will appear. Close this error and click on Browse to manually upload the OVF.
A new window will appear. Navigate to the folder you download the vSAN File Services files from VMware and select all six files. Click Next to continue.
Once the file upload is complete the wizard will move to the next screen.
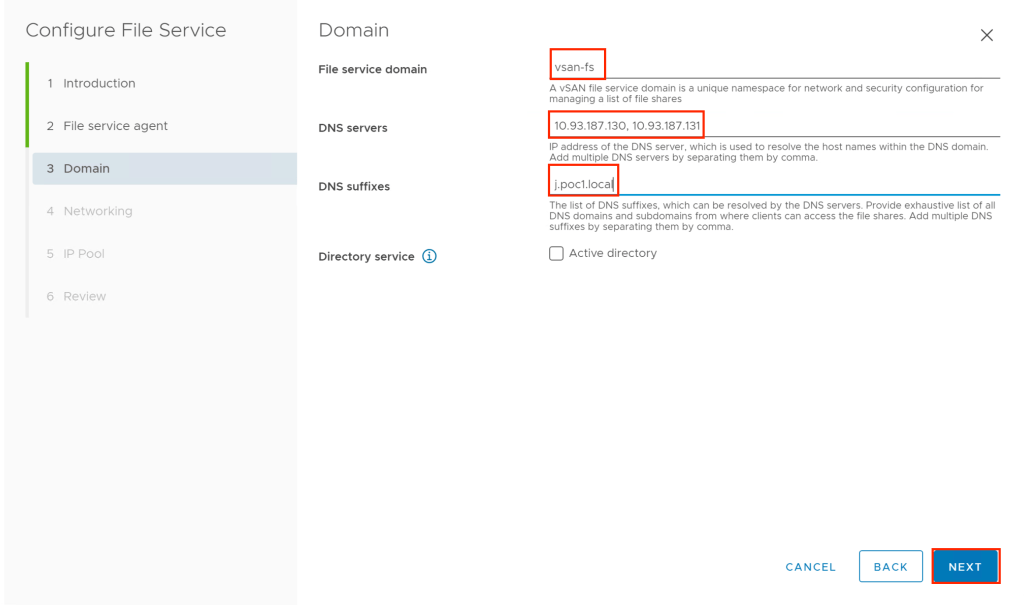
For the File Service domain. Give the system a friendly name. The example uses vsan-fs.
For the DNS Servers enter the IP address of the AD/DNS server you updated DNS on previously. If you have two AD/DNS servers in HA mode enter the addresses of both servers separated by a comma. The example uses 10.93.187.130, 10.93.187.131 as the DNS servers.
For the DNS suffixes use the domain you used when creating the instance. The example uses j.poc1.local.
Once complete click Next to continue.
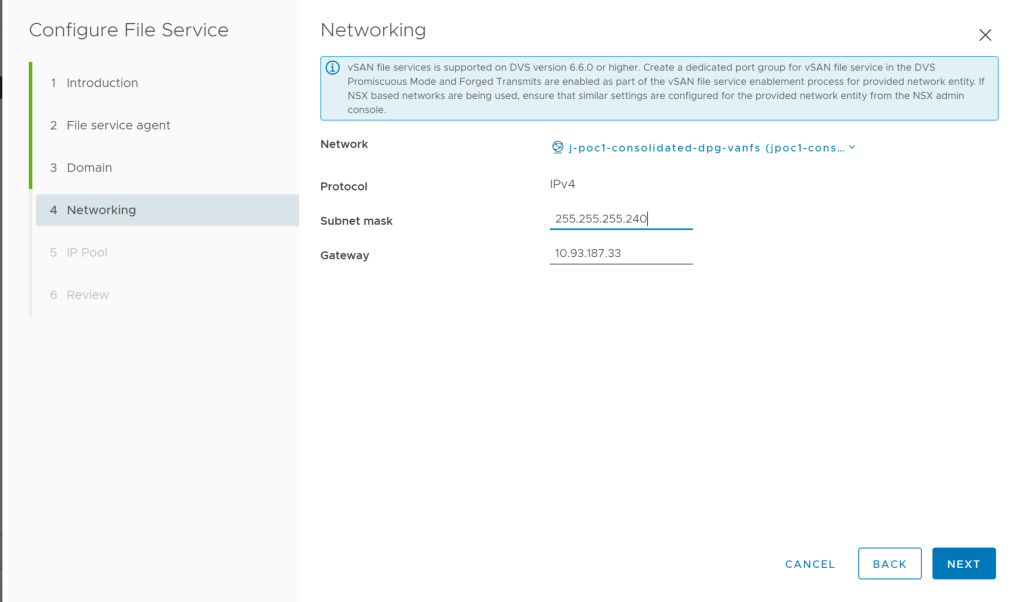
The Network tab will appear. Click Select and navigate or search for the distributed port group you created earlier.
Input the subnet mask and gateway of the private portable subnet you created earlier.
Click Next when complete.
The IP Pool page will appear. Type the IP address you assigned for the first host and click Autofill if you made the IP addresses sequential. Otherwise type in the IP address used for each host manually.
Once all IP addresses have been entered click Lookup DNS to verify that all addresses can be successfully resolved.
Once everything looks good click Next to continue.

Click Finish once you review your entries. It will take several minutes to deploy the service. Once complete you will see the service set as enabled with the information you provided.
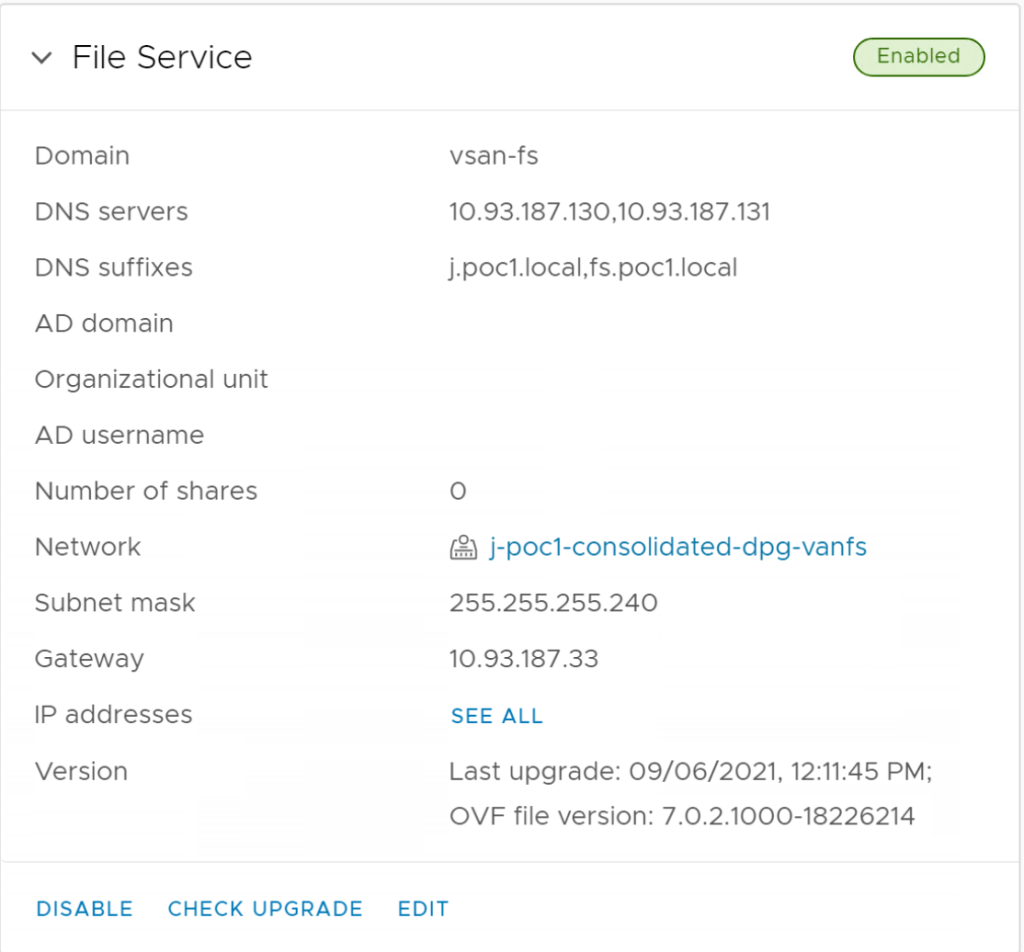
Now that File Services are enabled you can look at provisioning a file share. To do so under vSAN choose File Shares. Specific configuration of file shares will be covered in a future blog post.


Leave a comment